February 04, 2012

WALLS!!!

I'm finally building!! Today I FINALLY got to put the first floor walls up!! SUPER EXCITING!!!

Okay... So, it only took an hour to get them set, glued, and taped off... and now they've got to dry overnight... but that's why I had the time to sit and update all the blog posts. Because I'm REALLY bad about updating.

Anyway... there's not much to say except here's the first floor (minus the bay window area and the side access panel)
.


I may or may not have tried a few furniture arrangements while the glue was drying...

More prep work...

Hurray for prep work. I can't wait to get to the point where I'm actually BUILDING something!! The closest I've come is assembling the base. It went together with a couple of support beams and some glue. Not very impressive, but it's a start.


After the base was together, I started with some of the painting. There are two outside porches that needed the floors painted (white), and I did the internal ceilings at the same time. Since I was painting a large area I used a foam roller. You can get small rollers very inexpensively. They also work in the "real" world for painting trim or furniture.


In between coats of white I got the shutters painted. I was trying to bring out the rust color of the shingles, but my color choice ended up being too bright. I mixed a bunch of craft paint in and managed to get the color a little more earthy-looking. You can see both colors in this picture. The doors are the original color and the shutter parts are the mew, darker color.


Once the shutters were dry (two coats- and boy were they a pain to paint!) I assembled them (ie: glued the panels on the bases). I wasn't 100% happy with them though. I'd left them a little streaky to try and mimic the shingles (I love the look), but it needed something more. So, I dry-brushed a bit of copper around all the edges. It's not really apparent in the pictures, but it adds a little shimmer and I'm really happy with the final product.

December 30, 2011

Only a few find the way...

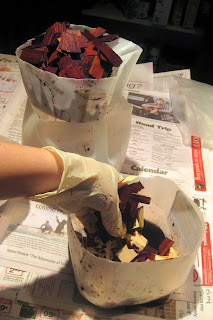
Long before you ever get to BUILD anything, there is a veritable ton of prep work. One of the first steps is getting the shingles dyed... Apparently you can't just stain shingles as you would any other piece of wood... there is, instead, a powered dye is mixed with water and then mixed with the shingles themselves to provide the appropriate color and finish. It's an interesting technique to learn and I can see it being useful in other endeavors.

We begin by cutting a gallon plastic milk jug in half. The bottom half becomes the bowl we mix the dye in, the top half becomes a funnel for draining (we drain into a second bowl).


After mixing the dye in our new bowl, we add a large handful of shingles and mix them with our gloved hand until all of the wood it coated. Then we dump the whole mixture into our new funnel and let the dye drain into the second bowl. Moving the funnel between the two bowls, we continue to dye the rest of the 1,200+ shingles in the same manner. Luckily, the dye does not smell.


After all the shingles are dyed and drained we dump them onto a stack of newspapers and let them dry for 4-5 days. Which is forever. Also, we stir them around every once in-a-bit so they don't get stuck together as they dry.


Now, there is a table of shingles awaiting a roof. After the new year construction will begin in earnest.

Begin at the beginning...

Christmas 2011 found me to be a VERY happy girl, as my husband Jeff bought me with a dollhouse kit. Now, I've decorated room boxes before, but I've never had the opportunity to do an entire house... I'll admit, once I was sitting at home, looking at the box, I was a more then a little daunted- this project is going to be HUGE!

Seriously- here's a picture from the front of the box (the kit is called 'Victoria's Farmhouse'). The miscellaneous small child should give us an idea of the scale. (The actual scale, in case you're curious, is 1:12).


So... Where to begin? The directions were a baffling array of terminology and blueprints that convinced me that I could as easily build a full-sized house as this miniature version. Oh- and none of the pieces were labeled... which gave me a place to begin.


December 28th I spent three hours and finally had some sense of what I was dealing with (and this picture shows maybe a third of the pieces). I also ran out of post-it notes.

So, dear friends, this is where the journey starts. Like Alice discovered in Wonderland, the best way to do anything is to "begin at the beginning and go on till you come to the end: then stop."